I have the following problem:
My Wifi works without problems under kernel 2.6.28-11 but it fails under kernel 2.6.28-13. I’m using the ath_pci driver.
Apparently there has been a change in the ath_pci wifi driver in kernel 2.6.28-13 that my hardware do not agree with.
Some people reports that the ath5k driver should be working but I can’t make it work on my machine.
By the way – I’m using Wicd as my wireless network manager without problems under kernel 2.6.28-11 in Gnome and KDE.
My advice for the moment is to stick with the 2.6.28-11 kernel to avoid wifi problems.
See also this link at Ubuntu forums
Tag: Ubuntu
Ubuntu 9.04 sound problem fixed
I have a brand new installation of Ubuntu 9.04 (with KDE4 as my default UI) on my desktop PC.
My problem was no sound in Youtube.com and in the game Openarena. However the login sound in Ubuntu played loud and clear.
I located the problem to be related to my ATI HD 2400 PCI-E graphics card. Alsa had this configured as my primary sound card and not my onboard VIA sound card.
This is how I solved it:
Step 1:
Go to a terminal and write:
aplay -l
The output will be something like this:
**** List of PLAYBACK Hardware Devices ****
card 0: HDMI [HDA ATI HDMI], device 3: ATI HDMI [ATI HDMI]
Subdevices: 1/1
Subdevice #0: subdevice #0
card 1: V8237 [VIA 8237], device 0: VIA 8237 [VIA 8237]
Subdevices: 4/4
Subdevice #0: subdevice #0
Subdevice #1: subdevice #1
Subdevice #2: subdevice #2
Subdevice #3: subdevice #3
card 1: V8237 [VIA 8237], device 1: VIA 8237 [VIA 8237]
Subdevices: 1/1
Subdevice #0: subdevice #0
In this output I can see my VIA sound card as Card 1, Device 0
Step 2:
Then I edited a file called asound.conf located in /etc (the file was not there so I created it)
sudo kate /etc/asound.conf
and put in the following configuration:
pcm.!default {
type hw
card 1
device 0
}
save the file
Step 3:
restart ubuntu.
Voila! Sound was playing everywhere.
Acer TravelMate 4310 WLAN and Ubuntu 8.04
The following works in Ubuntu 8.04
sudo apt-get update && sudo apt-get install build-essential
Get the MadWifi driver on http://madwifi-project.org/ticket/1192
http://snapshots.madwifi-project.org/madwifi-hal-0.10.5.6/
tar xvf madwifi-hal-xxxxxx.tar.gz
cd madwifi-hal-xxxxxx
sudo make install
sudo modprobe ath_pci
sudo modprobe wlan_scan_sta
sudo gedit /etc/modules
Insert the following lines:
ath_hal
ath_pci
save and exit
wpa_passphrase ssid
Type your password phrase
The section network={….} will be calculated
sudo gedit /etc/wpa_supplicant.conf
paste the section network={….} into wpa_supplicant.conf
save and exit
sudo gedit /etc/network/interfaces
auto lo
iface lo inet loopback
auto ath0
iface ath0 inet dhcp
wpa-conf /etc/wpa_supplicant.conf
wpa-driver madwifi
auto wifi0
iface wifi0 inet dhcp
wpa-conf /etc/wpa_supplicant.conf
wpa-driver madwifi
save and exit
Create a file under /etc/pm/config.d/ and add the problematic module to it, e.g.
sudo gedit /etc/pm/config.d/acer
SUSPEND_MODULES=”psmouse”
save and exit
sudo gedit /etc/modprobe.d/options
Insert the following line:
options ath_pci rfkill=0
save and exit
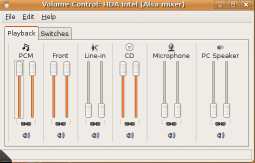
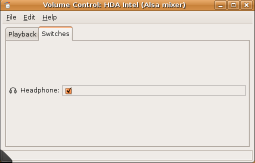
Headphone & Speaker Issue Ubuntu 8.04
Headphone & Speaker Issues:
Ussualy effect intel HDA sound cards…Sound comes out both fronts and headphones at same time!
My Solution for Ubuntu8.04………….Basicaly you just want to add a switch to the volume controll!
Tell alsa which driver to use for your hda intel sound card. You do this by first looking at the output of
Code:
head -n 1 /proc/asound/card0/codec*
Mine was:
Codec Realtek ALC888
SO you then issue the command:
Code:
zless /usr/share/doc/alsa-base/driver/ALSA-Configuration.txt.gz
Look for the subtitle “Module snd-hda-intel”.
In this subsection look for the name of codec “you” aquired from the output above…Mine was Realtek ALC888…so after locating the list for “Module snd-hda-intel” I scrolled down further to find:
ALC883/888 then I looked at the options directly under and chose “3stack-6ch 3-jack 6
channel” you may have to choose another option or experiment.
Important!!!!Now that you have an option what do you do with it………1st you only take the part of it…that is the part directly under the listed codec…for me that is “3stack-6ch“ and add it to the following line to get:
options snd-hda-intel model=3stack-6ch
Without the underline of course, so that it looks like:
options snd-hda-intel model=3stack-6ch
This is the line that you need to add to /etc/modprobe.d/alsa-base by doing the following:
For Ubuntu:
sudo gedit /etc/modprobe.d/alsa-base
When the new window opens, cut and paste the new line you have just made at the bottom of all the text, save and exit.
Restart and hopefully if you have not buggered up with the spacing as I did you should now have a SWITCH option in your “Volume Contol” found in the desktop panel. Just deselect or select to switch between speakers of headphones as it should have been from the start.
Solution to slow boot in Ubuntu 7.10
The problem with the slow boot is that the settings in Usplash can sometimes get messed up on install and hang up the boot. Removing some of the lines in menu.lst disables Usplash and fixes the problem. If you like the verbose boot up, then leave it. If you’d like the pretty Ubuntu boot up sequence, try this.
1) Open up /boot/grub/menu.lst
sudo gedit /boot/grub/menu.lst
2) At the very end of the kernel line after “splash” , add “vga=791”
3) Save that file, close it, and open up /etc/usplash.conf
sudo gedit /etc/usplash.conf
4) Change the screen resolution to the resolution you are actually using. Save it and close it.
5) Grub won’t know anything about this until you rebuild the boot, so do the following commands.
sudo update-initramfs -u -k `uname -r`
This rebuilds the image that Grub uses to start the system.
Voila, you have fixed the boot speed issue and gotten the splash screen back. Reboot and enjoy the fruits of your labor. This only works if Usplash is what was broken. Also, you can always hit CTRL-F1 when the splash is running to get back to your verbose mode.